Managing Frontend Dependencies & Deployment Part 3: Yeoman
So far in this series we’ve looked at Bower for managing our libraries and dependencies, and Gulp for handling our deployments. In this final part of our series on Managing Frontend Dependencies & Deployment we will look at an easier way to get new projects started with Yeoman.
Yeoman
Yeoman is a scaffolding tool — known as yo — with plugins — known as generators — that define how to generate a project’s structure.
To use yeoman, first we must install it — as will all npm packages, we can choose to install it globally or within our project… but as we don’t have a project yet globally makes more sense in this case:
$ npm install -g yo
Next, we install a generator — to start with, for our bower+gulp setup, using jquery and bootstrap, we can use a pre-defined generator: gulp-webapp
Again, installation is done using npm:
$ npm install -g generator-gulp-webapp
Once we have the generator installed, create an empty directory in which to scaffold your application, and inside of it run:
$ cd my-yeoman-project
$ yo gulp-webapp
The first thing this will do is output the Yeoman ASCII art logo, followed by asking you which libraries besides HTML5 Boilerplate, and jQuery you would like to use.
By default, all of the optional libraries are selected by default, to unselect them, use your cursor keys to highlight and hit the space key. Once you’ve done this, hit Enter… and that’s it.
Yeoman will now generate a gulpfile.js, setup bower with the selected dependencies, and scaffold out our app.
When this is done, our application directory looks something like this:
├── app
│   ├── bower_components
│   │   ├── bootstrap-sass-official
│   │   ├── jquery
│   │   └── modernizr
│   ├── images
│   ├── scripts
│   │   └── main.js
│   ├── styles
│   │   ├── main.scss
│   │   └── main.css
│   ├── 404.html
│   ├── favicon.ico
│   ├── index.html
│   └── robots.txt
├── dist
│   ├── scripts
│   └── styles
├── node_modules
├── test
├── .bowerrc
├── .gitignore
├── bower.json
├── gulpfile.js
└── package.json
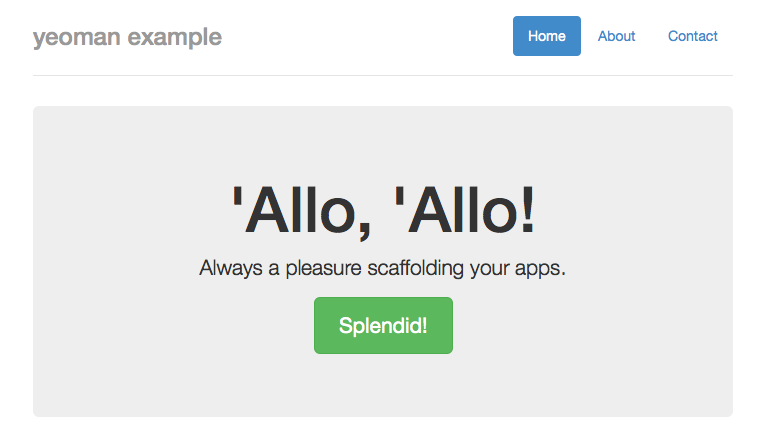
At this point, you can check out the result of our generator by running, gulp to build everything, then gulp serve to start a web server on port 9000:
Doing this and browsing to http://localhost:9000 will show you something like this:
Other Generators
Now, this is all well and good, but what if you want to create a new project based on a framework? Or with custom scaffolding?
First, you should check if there is a generator that meets your needs. There is a number of officially supported generators, and some 800+ unofficial generators.
It doesn’t matter if you’re creating a Wordpress plugin, or a single page application using AngularJS, there is probably a generator already made.
If there isn’t however, this is where you create your own generator.
Creating a Custom Generator
Let’s create a generator that will allow us to create skeleton apps using composer for a number of popular frameworks.
To get started, you will want to use the yeoman generator-generator — yes, a generator to generate generators (yo dawg…):
$ npm install -g generator-generator
Next, create a directory for your generator to live in, it should be named generator-<name>, in our case, we’re going to create a directory called generator-php-composer.
Then we can use the generator-generator to create our skeleton generator:
$ mkdir generator-php-composer
$ cd generator-php-composer
$ yo generator
Answer a couple of questions (your github handle, and the generator name) and away it goes.
When it has completed you will now find a project that looks like this:
├── app
│   ├── templates
│   └── index.js
├── node_modules
│   ├── chalk
│   ├── mocha
│   ├── yeoman-generator
│   └── yosay
├── test
│   ├── test-creation.js
│   └── test-load.js
├── README.md
└── package.json
A pretty standard node.js project, our app directory contains our generators code, then we have node_modules for npm packages with its requisite package.json to manage them, a test directory, and a simple README.md.
Additionally, we have an app/templates directory, this is where we can store files that will be copied into our scaffold, optionally replacing placeholders.
If we go ahead and open our app/index.js we’ll see its pretty simple:
- Import all the necessary npm modules
- Create our Generator object —
PhpComposerGeneratorby extendingyeoman.generators.Base - Define a number of methods that perform specific tasks
init: pull in thepackage.jsonand register a callback to runbowerandnpminstall after all other tasks have completeaskFor: prompt the end-user for informationapp: the primary scaffolding functionsprojectFiles: ancillary scaffolding functions
- Finally, we export the generator
Yeoman will run each of the defined methods in the order they are defined, and their names have no semantic meaning.
For our generator, we aren’t going to use bower or npm, so let’s update our init method to remove the callback. Also, let’s move our greeting here:
  init: function() {
    // Have Yeoman greet the user.
    this.log(yosay('Welcome to the PHP Framework Composer generator!'));
  },
Now let’s update the askFor method to gather some information from our user.
askFor: function () {
    var done = this.async();

    var prompts = [{
      name: "projectName",
      message: "Project Name"
    },
    {
      type: 'list',
      name: 'skeleton',
      message: 'Which framework would you like to use?',
      choices: [
          "zendframework/skeleton-application",
          "symfony/symfony-standard",
          "laravel/laravel",
          "silexphp/silex-skeleton",
          "slim/slim-skeleton"
      ]
    },
    {
      name: "dependencies",
      message: "Add another dependency? (e.g. vendor/package:version)",
    }];

    this.prompt(prompts, function (props) {
      this.skeleton = props.skeleton;
      this.projectName = props.projectName;
      this.dependencies = props.dependencies;

      done();
    }.bind(this));
  },
Here we define three prompts:
projectNamewhich simply asks the user to define where the skeleton app will be createdskeletonwhich will ask the user to choose a skeleton from a listdependencieswhich will ask the user for any other dependencies to include
You may also have noticed the first line our method is
var done = this.async();. This — similarly to gulp — enables us to make the method synchronous. When we are ready to move on to the next task, we calldone().
Our prompts are very rudimentary at this point and lacking any validation. To add validation, we simply add a new option validate which is a callback that receives the input and returns true on valid, or an error message on invalid.
Our Project Name prompt needs to validate that the input is a valid directory name, and that the directory does not yet exist:
    {
      name: "projectName",
      message: "Project Name",
      validate: function(input) {
        if (!/^[a-zA-Z\-0-9_]+$/.exec(input)) {
          return "Invalid Directory Name!";
        }
        if (fs.existsSync('./' + input)) {
          return "Directory already exists!";
        }

        return true;
      }
    }
Our dependencies prompt should validate that we got a proper package name and version.
Also, the dependencies prompt only allows us to specify one dependency, and we would potentially like to add many.
We can abuse the validation to continue asking until the user choose to stop:
First we will add an empty array at the top of our askFor method to store our dependencies:
  askFor: function () {
    var done = this.async();

    var dependencies = [];

    ...
{
      name: "dependencies",
      message: "Add another dependency? (e.g. vendor/package:version)",
      validate: function(input) {
        if (input.length == 0) {
            return true;
        }

        if (!/^(.*)\/(.*):(.*)/.test(input)) {
          return "Invalid package, please use the format: vendor/package:version";
        }

        dependencies.push(input);
        return "Enter another dependency, or just hit enter to continue";
      }
    }
This will return true when the user provides no input, or it will validate the package string and return an error if it doesn’t meet the requirements.
If the package is valid, it is added to our dependencies array and the function returns an error indicating that they should enter another dependency or hit Enter to continue.
Finally, we set this.dependencies to our dependencies array, instead of the props.dependencies (which would be empty).
this.prompt(prompts, function (props) {
      this.skeleton = props.skeleton;
      this.projectName = props.projectName;
      this.dependencies = dependencies;

      done();
    }.bind(this));
Now that we have our user input, let’s create a method to call composer create-project.
The first thing we need to do is import the child_process.exec() method so that we can execute composer. As with all imports, we add the following to the top of index.js:
var exec = require('child_process').exec;
Next, we’ll create our method:
  composerCreateProject: function() {
    var done = this.async();

    var cmd = "composer create-project " + this.skeleton + " " + this.projectName;
    console.log("[" + chalk.yellow("Composer") + chalk.reset() + "] Creating Project...")
    exec(cmd, function (error) {
        if (error) throw error;
        console.log("[" + chalk.yellow("Composer") + chalk.reset() + "] Project created!");
        done();
    });

  },
Again, we make our method async, this is because we need to wait for the command to complete before we can add our extra dependencies.
We output a status message to the user using console.log, and using chalk to make it fancy, then we execute the composer create-project using exec().
Our call to exec() includes a callback that will throw errors to the console, or output a success message (again using console.log and chalk) and then call the done() function to allow the generator to advance.
Our final method will use composer require to add our dependencies:
    composerAddDependencies: function() {
    if (this.dependencies.length > 0) {
      var dependencies = this.dependencies;

      console.log("[" + chalk.yellow("Composer") + chalk.reset() + "] Adding Dependencies...");

      for (var i in dependencies) {
        this._composerInstallDependency(dependencies[i]);
      }
    }
  },
  _composerInstallDependency: function(dependency) {
    var done = this.async();
    exec("composer require " + dependency, {cwd: this.projectName}, function (error) {
      if (error) throw error;
      console.log("[" + chalk.yellow("Composer") + chalk.reset() + "] Added " + dependency);
      done();
    });
  }
This method is very similar to our composerCreateProject method, except that we loop through the this.dependencies array and run multiple commands.
To ensure these run synchronously, we create a private method, _composerInstallDependency which will synchronously run each composer require call.
To test our generator, we need to tell npm where it lives, to do this, we run npm link in the root directory.
At this point, our generator is ready to go:
$ yo php-composer
You can review the full code for our generator here
What’s Next?
Now that your frontend toolchain is starting to come together with bower, gulp, and now yeoman, you can soon begin to automate your environment, and deployments — which is, after all the entire point of all this.
What does your current toolchain look like? If you don’t have one yet, what’s holding you back? We’d love to hear your thoughts on frontend toolchains below.







Share your thoughts with @engineyard on Twitter